Tutorial
It explains how to set up the environment for building ThorVG and how to draw various graphic elements through ThorVG with simple examples.
Build and install
You can download the ThorVG tarball via the Releases link. The latest version is recommended.
ThorVG supports meson build system. Install the meson and ninja if you don't have them already.
Run meson to configure ThorVG in the thorvg root folder.
Run ninja to build and install ThorVG:
Regardless of the installation, all build results (symbols, executable) are generated in the builddir folder in thorvg. Some results such as examples won't be installed, you can check More examples section to see how to change it.
Note that some systems might include ThorVG package as a default component. In that case, you can skip this manual installation.
Build with Visual Studio
If you want to create Visual Studio project files, use the command --backend=vs. The resulting solution file thorvg.sln will be located in the build folder.
Build with Xcode
If you want to create Visual Studio project files, use the command --backend=xcode. The resulting solution file thorvg.xcodeproj will be located in the build folder.
Basic Programming
ThorVG supports C++ Programming Interfaces. The following is a quick-start to show you how to use the essential APIs. As the prerequisite, include the ThorVG header file in your source code.
Initialization
In the first step, initialize the ThorVG engine. This prepares and runs the engine internal steps.
The second parameter of the Initializer::init() requires the ThorVG designated threads number. To use full capacity of the system, you can pass the number of threads to run ThorVG tasks. It will spawn the threads and run Task-Scheduler to progress multiple jobs asynchronously. If you don't know the exact number, you can use std::thread::hardware_concurrency() instead.
ThorVG renders vector scenes to the given canvas buffer. The following shows you an example how to prepare an empty canvas for drawing:
If you have your own canvas buffer memory, you can pass its pointer to the canvas. SwCanvas::target() requires five parameters: buffer memory, buffer stride size, canvas width, height and Colorspace. The last parameter determines the format of the pixel color channels used during drawing scene on the canvas buffer.
Shape
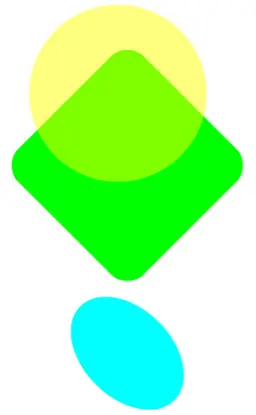
Once a canvas is ready, you can create shapes by adding them to the canvas.
In the example above, a shape is generated and then a rounded rectangle is appended to it. ThorVG provides predefined shape types such as rectangle, circle and arc for the user's convenience. You can append any custom shape by using Paths. ThorVG allows you to append multiple forms into a shape, to compose a more complex one. A complex shape shares its properties, such as color, stroke, fill, etc., among the appended forms.
After a rounded rectangle is appended, its color is set and then the shape is added to the canvas.
This shape from the example looks as follows:
Path
Besides predefined shape types, you can compose arbitrary shape types using a path concept. A path is a list of commands that are commonly used in traditional 2D vector drawing. Below you can see an example of how to define your own forms.
By using the Path, lines and Bezier curves can be drawn. Additionally, you can set preset list using
Shape:appendPath() for optimal data delivery.
The output of the example is as follows:

Fill
Besides predefined shape types, you can compose arbitrary shape types using a path concept. A path is a list of commands that are commonly used in traditional 2D vector drawing. Below you can see an example of how to define your own forms.
The output of the example is as follows:

Stroke
Stroking enables you to draw the outline of shapes as well lines. You can simply add stroke properties to a shape if needed. Stroke supports both a solid color and a gradient fill and also 4 major properties - width, cap, join and dash pattern.
The output of the example is as follows:
Scene and Transformation
ThorVG provides an interface to build Paint groups by composing multiple Paints. This is useful when you consider a scene-graph structure and manipulate a scene as a control unit. The code below shows how to use the ThorVG Scene and transform it.
All kinds of Paint type nodes (Shape, Scene and Picture) can be added to the Scene as its children. You can scale this logic and build a complex scene by compositing multiple Scenes. In the example, we create a scene-graph tree and we demonstrate how to transform it using translate(), scale(), rotate() methods. ThorVG also supports the transform() method which expects a transformation matrix.
The output of the example is as follows:
Picture
The Picture is a special component that is designed to draw a scene on the Canvas from image data. ThorVG supports several image formats including vector-based and bitmap-based formats.
The output of the example is as follows:

Text
ThorVG offers robust text rendering capabilities, including support for Scalable TrueType Fonts (TTF). It efficiently handles Unicode text, accepting UTF-8(or ASCII) characters as input. ThorVG processes these characters by converting them into Unicode codepoints, subsequently generating vector data for the corresponding glyphs. Additionally, ThorVG utilizes the metrics of TTF glyphs to create horizontal layouts, further enhancing its text rendering functionality.
Note that the global font data loaded into ThorVG is typically shared among various text objects. This font data is automatically released when the ThorVG engine is terminated, which is done using Initializer::term(). If you need to immediately free up the font resources, You can manually unload the font data using the Text::unload() API.
The output of the example is as follows:

Composition
ThorVG applies composition for visual effects such as blending, masking, filtering, etc. You should be aware though, that a composition may perform an additional render-processing on an off-screen buffer. The excessive usage of a composition won't be helpful if lightweight processing is a priority for you. A hint - sometimes you can avoid a composition by changing the application or the design approach while maintaining the same visual effects.
The output of the example is as follows:
Animation
The Animation component facilitates the manipulation of animatable elements, such as Lottie. It enables the display and fundamental control of animated frames. Essentially, one animation instance corresponds to a single picture instance. You can assign any animatable resources to the associated picture and play the animation using the animation instance.
First, an animation and a picture are generated. The Lottie file (lottie.json) is loaded into the picture, and then the picture is added to the canvas. The animation frames are controlled using the animation object to play the Lottie animation. Also you might want to know the animation duration time to run your animation loop.
Let's suppose the progress variable determines the position of the animation, ranging from 0 to 1 based on the total duration time of the animation. Adjusting the progress value allows you to control the animation at the desired position. Afterwards, the canvas is updated to redraw the picture with the updated animation frame.
Drawing, the final step
Once all paint nodes have been added to the canvas, you can request the drawing task as the final step. Calling Canvas::update() triggers the preprocessing stage of the rendering pipeline, but it does not perform rasterization. The actual rasterization occurs when Canvas::draw() is invoked.
Since all rendering tasks are executed asynchronously under the hood, you must call Canvas::sync() at an appropriate point to ensure proper synchronization. Once synchronization completes, the rendered image becomes available in the target buffer.
After getting the frame image, you can flush out all the added paint nodes from the canvas with Canvas::remove() call.
More examples
There are plenty of sample code in thorvg.example to help you in understanding the ThorVG APIs. Please also refer to the project documentation for further details.
